Where is OneDrive account information stored?
Windows stores OneDrive account information in the Credential Manager, which is a built-in Windows tool for managing user credentials. To access the Credential Manager, follow these steps:
- Press the Windows key + R to open the Run dialog box.
- Type "control keymgr.dll" and press Enter.
- In the Credential Manager window, click on the "Windows Credentials" tab.
- Look for the entry for "OneDrive Cached Credential" or "MicrosoftOffice15_Data:Live:cid=" followed by your OneDrive account email address.
- Click on the entry to expand it, then click "Remove" to delete the stored credentials.
When you next sign in to OneDrive, Windows 10 will prompt you to enter your account information and will store the new credentials in the Credential Manager.
Can I transfer Credential Manager to a working machine to access my one drive account
Unfortunately, you cannot manually transfer the Credential Manager to another Windows PC to access your OneDrive account. The credentials stored in the Credential Manager are encrypted and tied to the specific Windows installation and user account on which they were created.
If you want to access your OneDrive account on another Windows PC, you will need to sign in to OneDrive with your Microsoft account credentials on that PC. You can do this by opening the OneDrive app or website and entering your email address and password. Once you have signed in, your OneDrive files should be available for you to access on the new PC.
Alternatively, you can use the OneDrive sync client to synchronize your OneDrive files between multiple devices. This will allow you to access your OneDrive files on any device that is linked to your Microsoft account. To set up OneDrive sync on a new Windows PC, you can download and install the OneDrive app, sign in with your Microsoft account, and then select the folders you want to sync.
One Drive Data Recovery Case Study
12 April 2023 - Obviously if you knew your one drive account details you would just login to a new system to retrive your data but the owner of the laptop did not have this. The laptop would not boot and had been to a computer store for lcd hinge repair. When it arrived at zero alpha it was in a boot repair only mode. All inbuilt windows boot repair options failed. Manual bcd and mbr editing was tried and failed. No system restore points were available. The last hope was to use DISM.
To fix Windows from a USB stick using DISM
follow these steps:
-
Insert the USB stick with the Windows installation files into your computer.
-
Open the Command Prompt with administrator privileges by right-clicking on the Start button and selecting "Command Prompt (Admin)".
-
Type "diskpart" and press Enter to open the DiskPart utility.
-
Type "list disk" and press Enter to display a list of all the disks connected to your computer. Make a note of the disk number of the USB stick.
-
Type "exit" and press Enter to exit the DiskPart utility.
-
Type "dism /image:C:\ /cleanup-image /restorehealth /source:E:\sources\install.wim" and press Enter, replacing "C:" with the drive letter of the Windows installation that you want to repair and "E:" with the drive letter of the USB stick.
-
Wait for the DISM tool to complete the repair process.
-
Once the repair process is complete, type "sfc /scannow" and press Enter to run the System File Checker utility.
-
Wait for the System File Checker utility to complete the scan and repair process.
-
Restart your computer and check if the issue has been resolved.
Note: Make sure that the Windows installation files on the USB stick are the same version as the installation on your computer.
This failed first time because modern windows usb sticks have install.esd instead of install.wim
You can use DISM to extract the "install.wim" file from an "install.esd" file
Here's how you can do it:
-
Insert the USB stick with the Windows installation files into your computer.
-
Open the Command Prompt with administrator privileges by right-clicking on the Start button and selecting "Command Prompt (Admin)".
-
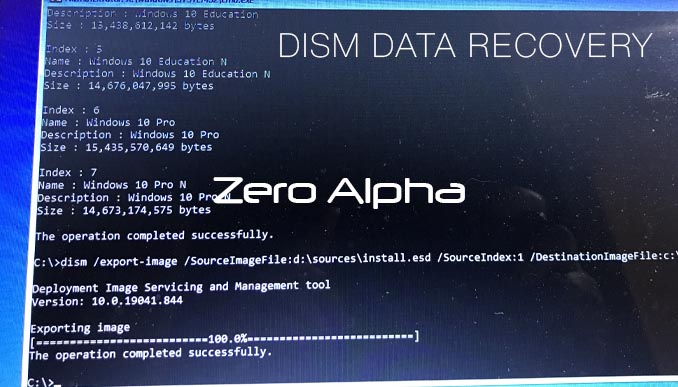
Type the following command and press Enter to determine the index number of the Windows edition in the "install.esd" file:
dism /get-wiminfo /wimfile:X:\sources\install.esdReplace "X:" with the drive letter of the USB stick.
-
Make a note of the index number of the Windows edition that you want to extract.
-
Type the following command and press Enter to extract the "install.wim" file:
dism /export-image /SourceImageFile:X:\sources\install.esd /SourceIndex:index_number /DestinationImageFile:C:\install.wimReplace "X:" with the drive letter of the USB stick, "index_number" with the index number of the Windows edition that you want to extract, and "C:\install.wim" with the location where you want to save the extracted "install.wim" file.
-
Wait for the extraction process to complete.
-
Once the extraction process is complete, the "install.wim" file will be saved to the location you specified.
Note: Make sure that you have enough free space on your hard drive to save the extracted "install.wim" file.
The extracted install.wim was saved to a zero alpha cloned donor hard drive of the faulty system. The first dism command was re-run.