N00B
- Answering Phone
- Testing Drives
- Job Quoting
- Asking for help
- Job Flow chart
- Saving files on PC3000
- Saving files on Rstudio
- Check if trim is enables in SSDs with rstudio
- Disassembling the drives and head swaps
- Fix device manager bus driver issues
- Selling hard drives
- Selling PCB's
- Photoshop tips
ANSWERING PHONE:
Zero Alpha Data Recovery Jacob Speaking
TESTING DRIVES:
Use our software first with connected drive via USB cord or SATA cables. If the drive detects, make sure you have Zero Alpha app running as ADMIN. Click on test on your drive that you are trying to quote:
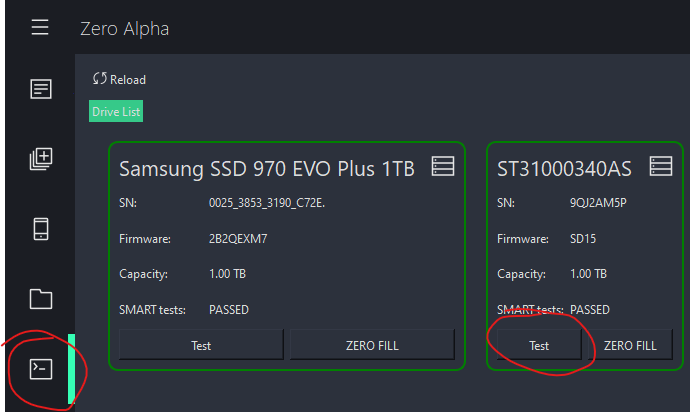
If you get SMART TEST FAIL, reallocated sector count, current pending sector or g-force sensor and numbers next to them - Drive has bad sectors, got dropped/shaken around. It is CAT3 or 4 hardware level.
If drive does not detect, connect it to PC3000 sata cables (if it is Sata drive) or leave usb drive plugged in, and go to PC3000 usb utility if it is Western Digital or Samsung.
SEAGATES ARE NEVER USB DRIVES, they have special connector usb-to sata,get the drive from the case and connect it to sata PC3000 cables if it does not detect.
Always connect terminal to Seagate drives unless inside of usb enclosure.
Turn on
Autodetect / Select Utility based on brand
Look for full ID: Model, Serial, Firmware & FULL CAPACITY

Look for any errors loading utility:

Do MRB:


Watch for Errors!!!! or Slow reading!!!!!
Do SMART test:
Click Alt+S on the keyboard or go to Tools -> View S.M.A.R.T
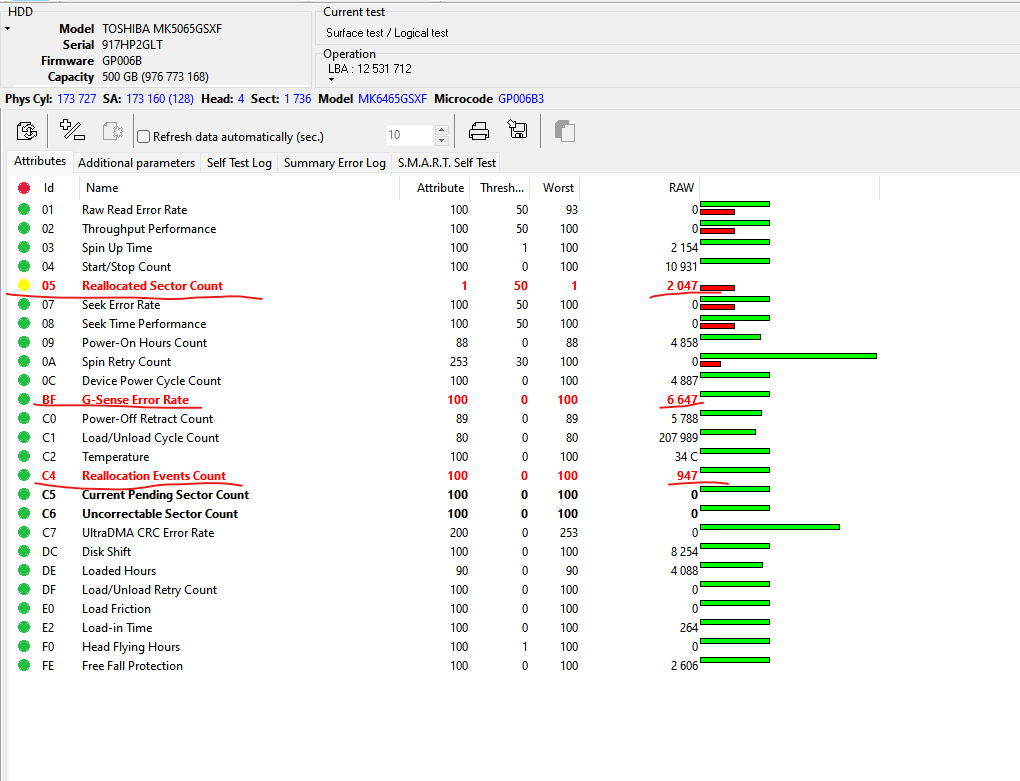
If you see Reallocated Sector Count, G-Sense Error Rate, Current Pending Sector Count or/and Reallocation Events Count in red and numbers next to them - Drive has bad sectors, got dropped/shaken around. It is CAT3 or 4 hardware level.
Do logical test / Read test
Just click ok on default settings:

Watch for Errors!!!! or Slow reading!!!!!
Scan for at least 5 minutes / miniumum 20,000,000 sectors
Check top right corner for Errors, or
Check bottom left "Log" tab for errors
Do you get errors?

Stop the Logical test / Read test and put it in reverse:

2 minutes
JOB QUOTING
Double check with your manager on the quote before quoting the customer if possible. If the customer does not want to go ahead on the quote, suggest a low priority (2 week) service. Ask your manager for suitable price for low priority job. Please give a feedback to the manager at the end of the quote.
Let the customer fill out the form, if they want urgent service they will select it themselves. If you are quoting the job that been posted to us, ask if it is urgent. Yes, we can do urgent jobs and it is not a problem. If it is a CAT 4 check if we have parts in stock and it is urgent service. Always check this stuff with the manager anyway.
Do not give a lot of technical information to the customer, they are not technicians. Do not try to prove the quote to the customer, you are not obliged to do so.
Always send sms to the customer with the price if it is a go ahead!
Ask priority data.
Quoting SSD's
Check what controller and if it is supported by pc3000. https://blog.acelab.eu.com/pc-3000-ssd-list-of-supported-ssd-drives-regularly-updated.html
If drive becomes ready in pc3000, use universal utility.
Quoting Macbook's
Check model and if we have an article. Check if SSD is built in
Asking for help:
What Device is it?
What Model is it?
What does the customer say is wrong with it?
What do you know is wrong with it?
Do we have an article about this device/problem?
JOB FLOW CHART
JOB IN
Record job to our software. Record Model and Serial. Add Spare if exists. Send sms with the price. Record priority data.
Job Box: Write Customers name with whiteboard pen
Write customer's name with black sharpie on the metal of the drive and on PCB!
JOB IN PROGRESS
Add to notes all processes done and results of that process.
JOB DONE
Demonstrate results to customer either in office or if remote use file list
Warn customer if results are RAW or Orphaned.
Get payment in full before releasing results (ALWAYS)
Close job in our software
Close job box by marking (' XXX Date ') with whiteboard market but leave on shelf for grace period.
SAVING FILES ON PC3000
Follow the steps to save properly on PC3000.
1) Select the root directory to save the marked files. You will also be prompted to the next pop-up. 

2) After selecting where to save, you will be prompted to the next page:
 3) Choose 'Delete file' as this will ensure all bad/corrupted files will not be the final saved results for the customers.
SAVING FILES ON RSTUDIO
Below shows the proper settings for saving.


CHECK IF TRIM IS ENABLED IN SSDs WITH RSTUDIO
For file deletion recovery, TRIM will normally zero-fill deleted data, making it near impossible to recover.
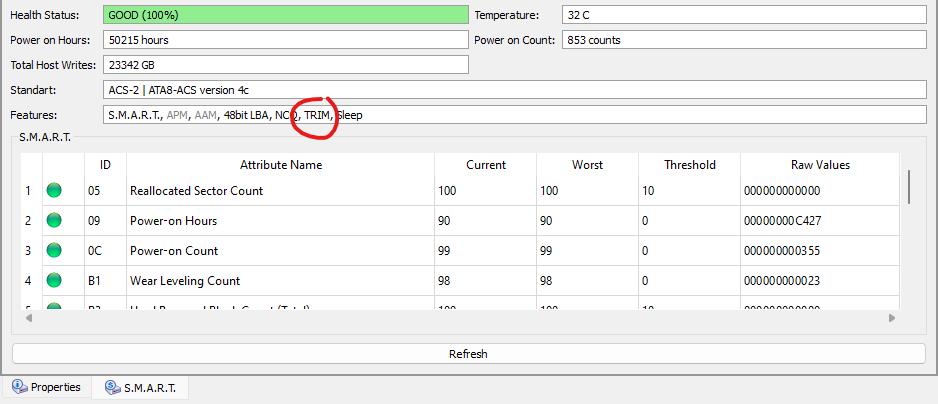
To check if TRIM is enabled on the SSD:
- Clicking on a drive ⮕ Click 'S.M.A.R.T' tab
- TRIM is enabled if it is in black
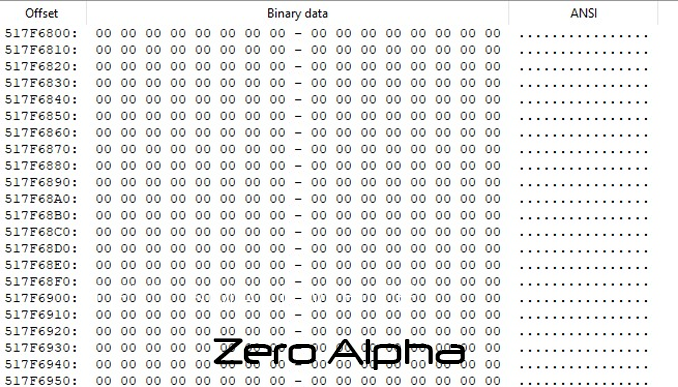
If TRIM is enabled, very low chance that there's anything worth recovery.
- Right click the file and view Hex
- If there are only 0s, there is no hope
DISASEMBLING THE DRIVES AND HEADS SWAPS
Before disassembling the drive, make sure you wrote customer's name on the drive and the PCB.
Make sure you retested the patient drive and checked quality of the donor drive: did MRB,SMART test and read test of the donor drive.
Always put correct pcb back on the customer's patient drive, never mix them up with the donor!
Make sure you wear gloves for the Heads Swaps.
The patient drive on the right side on the drive holder, donor is on the left side on the drive holder. Takes pcbs off. Make sure you marked pcbs! Check for screw underneath the pcb.
Platters are away from your for both drives.
Make sure you lock the heads with the screw preventing its moving in Z-axis (up/down).
Find the correct head tool. If you are struggling with finding correct tool, let your colleagues know immediately.
Do not touch the platters.
Do not forget to dust off the platter and inside the patient drive when you finished (with air).
MAKE SURE THAT A MAGNET AND ALL SREW HOLES ARE ALIGNED PROPERLY!
Put correct pcb back on the drive.
FIX DEVICE MANAGER BUS DRIVER ISSUES
If your device manager looks something like this:
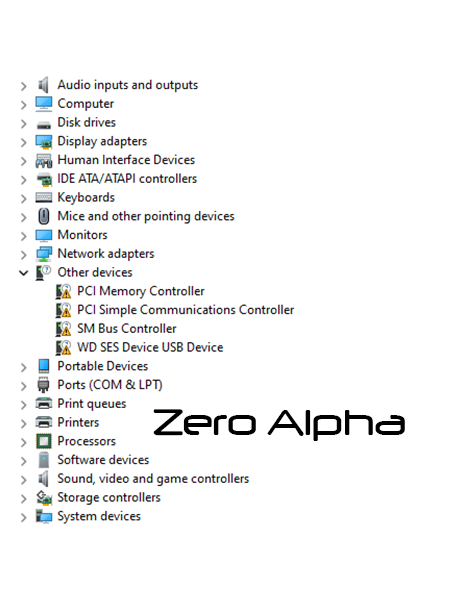
It means that there are driver issues that can affect drives that are connected to the PC. What to do:
1) Check that all the cables are connected properly. For PCs with an I/O shield, check if they are popping out and push them back in.

2) Go to this site: https://www.intel.com/content/www/us/en/support/articles/000006383/software/chipset-software.html and install Intel Chipset Software Installation Utility. After that has run, go back to the device manager and right click, choose the option 'Scan for Hardware changes' and that should update the manager. The device manager looked like this after the software was installed.

You can see that it fixed both the 'PCI Memory Controller' and the 'SM Bus Controller' issues.
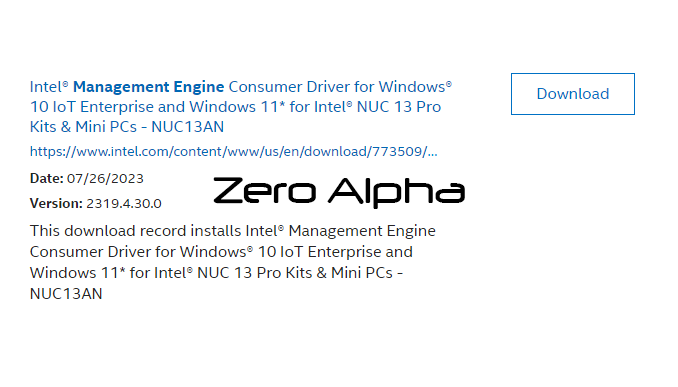
3. To fix the 'PCI Simple Communications Controller', download the Intel Management Engine Consumer Driver for Windows for Intel NUC using this link: https://www.intel.com/content/www/us/en/search.html?ws=text#q=Management%20Engine&sort=relevancy&layout=table&f:@tabfilter=[Downloads]&f:@stm_10385_en=[Intel%C2%AE%20NUC]
Again, run the 'Scan for Hardware Changes' and this is what the device manager looked like.

WD SES Device USB Device is an issue related to Western Digital's handling of their device drivers. As long as the plugged in WD drives are working, there should no concern.
4) Update Windows 11. It will automatically install certain missing drivers.
SELLING HARD DRIVES
1) Check orders on ebay and find the hard drive making sure it matches serial number.
2) Test hard drive on app or pc3000 SMART

3) Zero fill hard drive and select jump on write errors


ALTERNATIVELY use PC3000 Utility

Select the device you are zero filling and click start

Select fill by 0x00

4) Clean drive of any markings such as permanent marker or customer details.
5) Place "warranty void" sticker on the PCB where the screw is and on the lid where there is an edge between a sticker and metal
6) Add postage to ebay. At the top of the products ebay page select view order details and follow the page to either print postage label or add tracking number.

7) Print and sign Ebay Donor letter
8) Wrap hard drive in bubble wrap and add ebay letter to inside of package. Add postage label and send to post office
9) Delete hard drive from mongo
SELLING PCB'S
1) Check orders on ebay and find the PCB making sure it matches the model number including the rev number.
2) Check PCB for burn marks, ROM chip and markings. Clean hard drive of permanent marker if necessary.
3) Place "warranty void" sticker on the PCB on at least one screw hole.

4) Print and sign Ebay PCB letter.
5) Bubble wrap PCB and add PCB letter into package.
6) From the top of the PCB product page, find View order details and follow the instructions to either print postage label or add tracking number. Add postage label to package if required and send to post office.
PHOTOSHOP TIPS
Change colour of image
Select the image tab, you can use Auto tone, Auto contrast, Auto colour or experiment in the adjustments tab.

Take out background of image
Select too and highlight background of photo
